
This is a quick start guide to the ClassView ROOM. It will show how to switch cameras, how to connect your laptop and switch between content sources as well an overview on how to use the remote controls to set your room up effectively.
ClassView powers the video, audio and content in your spaces. It allows you to control your cameras and content being shared during your live ClassView sessions. The sharing and camera options available can be quickly accessed from the Control Panel (by selecting the camera view) and the Quick Control Pad (content share on/off and self View).
In preparation for hosting a connected scheduled ClassView session, the below covers the basic controls available from your immersive space.
The Control Panel
The Control Panel, positioned on your Lectern or tabletop, is an essential tool during live ClassView sessions. It allows you to seamlessly switch between the front Presenter View and the rear Class View camera, depending on the type of session you are conducting. The Control Panel enables you to easily toggle between various content sharing sources throughout your session.
Camera Control Button
You can find your Camera Control Button on the Control Panel, simply to choose from: Presenter Camera and Class View Camera.
- Use the Control Panel to toggle between the rear Presenter Camera and front ClassView camera.
- You have the option to turn SELF-VIEW on or off, allowing you to see your own camera feed on the screen.
Presenter View Camera Setting
- If you are teaching or presenting from your Immersive Classroom Space press Presenter View.
- After selecting Presenter View, the tracking camera will be given priority and this image will appear on all the front screens in the other remote ClassView Rooms that you may be connected to as well as for remote participants connected from laptop or mobile and
ClassView Camera
-
If you are receiving teaching into an Immersive Classroom Space press ClassView Camera.
-
Once selected the camera displaying the learners in your physical space will be the main camera and displayed on screen for connected spaces and participants joining over the browser.
Content Sharing Source
- You can choose switch between content sharing sources and switch from your laptop or local PC by simply pressing the PC button or Table HDMI (Laptop content).
- To quickly turn content sharing on or off and self view display options, see section below on quick control pad.

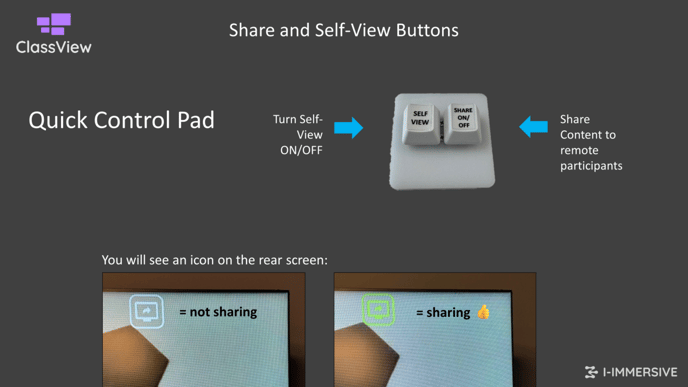
Quick Control Pad: Share and Self View Buttons
Your Quick control pad is located on your lectern tabletop. Sharing content is easy with our on/off button. Self View can also be switched on or off live during a session.
- When sharing the green icon will appear on your rear screen.
- When you are not sharing content, a grey icon will appear on the rear screen.
Connecting your Laptop to Share Content
Easily share your content with just one press of a button to toggle between your PC in Lectern to Table HDMI input on the Lectern.
- Begin by connecting your laptop using the HDMI cable to the input in your Lectern Pop up.
- There are also some handy power sockets in there too.
- These units located in your lectern will pop up when pressed down. To push them down again, you just need to press them firmly.
- If you have a Type 1 unit, you will also have wireless phone charging (just place your phone on top).

ClassView Pod Remote Control
Although you don't need to use the remote control as sessions are automated, it's handy for technical support. The remote control can be used for basic functions if needed.
- Mute Microphone: this mutes the microphones in your space only. To mute all microphones, use the live moderator control when joining as a moderator from your laptop.
- Answer Call: This will answer and connect any manual call made to your ClassView Pod/Immersive Classroom.
- End Call: this will end the session for all and disconnect your space from the session, other participants and spaces will continue to be connected.
- Self View: will display your video tile on view
- Volume up/Down: controls the volume in your space.
- SETTINGS will allow you to change devices and also reboot the system should you need to.

ClassView Tracking Camera Remote Control
You should only need the ClassView Tracking Camera Remote Control, to turn the tracking on or off for a session.
- Press number 1 on the remote control.
- Go close to the camera you would like to configure, viewing the menu on the Self-view Display.
- Go to Tracking in the menu and toggle left and right to turn the tracking on or off
![]()
Contact support
Contact our dedicated and experienced support team for any ClassView related support enquiries.
Call support: 0330 053 1700
Email: support@classview.com